Thursday, January 29, 2009

"Fairy Tale Castle"


I finished this small picture this week (19x20 cm/7,5x8") - it's an embellishing, embroidery, beading and recycling project at the same time, as I actually made the castle part - the one in petit point - when I was a teenager ... and for some reason, I now found it in my stash.

As I wrote in my last posting, I'm very keen on embroidery at the moment - but still I would like to combine it with some sort of recycling, and whenever possible, with embellishing /punching, as well.

I'm also torn between the "romantic projects" - like this one - and the plain, straight, modern - or medieval and older - ones. And I'm still very interested in that Wiking period ... I'm reading about it, thinking, drawing, collecting material ...

Wednesday, January 28, 2009

"Being a part of it" and some embroidery


Yesterday I finished this round embellished picture, it's quite big, diam. 43 cm (17"), consisting of embellished wool roving, pre-felt, cloth, yarn, fibers ... I haven't done any kind of embroidery or beading on it this time, as I wanted to keep it "natural" ... The colours come out a bit warmer in real as on the photo.

I'm much happier with this one than with the bird of previous posting - maybe I should just stick to my own colours in the end and keep it - yes, plain and simple!

But as I'm fascinated of embroidery lately, I made a some "embroidery whatiffing" after browsing through "The New Crewel" by Katherine Shaughnessy: I took a detail out of her patterns, simplified it a bit more, used other stitches and beads instead of french knots ... well, it was fun doing!


What I like about this book is that she uses modern (sometimes a bit "retro") and simple graphic designs with a traditional embroidery technique, which inspires me to draw some patterns of my own ... we'll see where that leads ...

Tuesday, January 27, 2009

Whatiffing 105-113, Dull and Glossy


Some new Whatiffings: these are different thin fabric scraps on multi-coloured pre-felt, punched and then hand embroidered with glossy silk thread.

(I took a lot of pictures of a new project today - forgot to put the memory card into the camera - have to wait for new daylight tomorrow ... it's one of those days. Sigh.)

Monday, January 26, 2009

This Bird of Paradise


I've been working on this bird of paradise lately - at first, not really planning a motif, just punching different red and pink fabrics and fibers onto a red woolen cloth, letting them blur into the background.

The left part was originally a blue-blackish fabric with a pink flower print, which I punched onto black wool and then added hand and machine embroidery to.

I sew and partially punched the fabric for the bird onto the background, forming the outlines while sewing it on, padding it here and there with some wool fibers.

Finally, I added a hanging which I made out of some black metal wire and I noticed how different a picture looks with some sort of hanging - I'll show you "My Grandmother's Garden" again, this time with the birch branch added:


For this purpose, I ironed on a suitable stabilizer as a lining for the back - it makes it hang smoother.

Saturday, January 24, 2009

A beaded landscape


I've done this landscape, mostly using thin cotton fabrics with flower prints, which I got in the swap from Paula. I embellished them on to a piece of grey, woolen cloth.

The landscape lines are made out of seams from an organza skirt.

Then I added hand-dyed woolen curls and glass beads, even some corals and turquoise are to be found here and there.

Friday, January 23, 2009

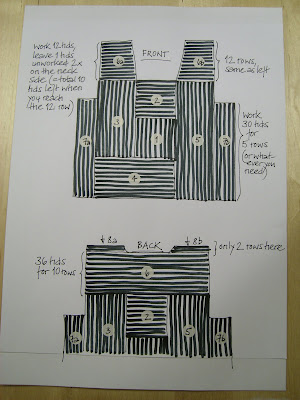
A crocheted vest with tutorial - a week-end project


During the holidays, I started crocheting a vest to wear while working. I used a black&white yarn from my stash, but of course you can use whatever left-overs you have - you might even want to stripe it or change colours in between ... Or use different shades of a certain colour range ... You can work an edge around neck and arms, or crochet a lace at the bottom or work a fringe ...

I used a 8 mm crochet needle, doing half double stitches with a fairly thick yarn, but when you've figured out the way how it works, you can do it anyway you like. But I think you should have crocheted before, not being an absolute beginner, as you need some experience of crocheting to get it smooth and even, especially if you're using different kinds of yarn.

My vest is 58 cm long and 55 cm wide, fitting a European size 40-44, I guess - but you can easily adjust the measurements by adding (or leaving out) some rows at the sides or at neck or bottom.
(Please click at the pics for better reading!)


I hope you've got the idea - I've never made a tutorial before, and explaining crocheting in English is a challenge as well!

If you're trying it out, I'd love to see your result!

Thursday, January 22, 2009

Mammoth and elf ...


This is a mammoth (I think). He just popped out of the white wool roving I was punching with a patterned organza. The only thing I had to do, was to cut him out and emphasize his eye a little more with some black wool fibers. I wonder if he would like to move on to a woolen cave painting ...

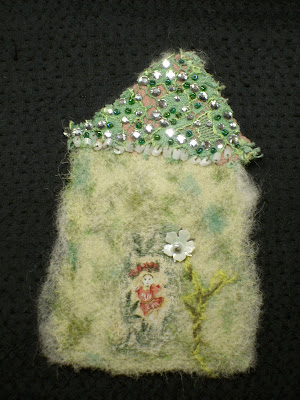
Then I saw a tiny green house taking form while I was trying out a thin green-printed silk scarf on the roving. I took a closer look and suddenly discovered a little elf standing in the open door.

She asked me to fix the roof - somewhere on my working table, she had seen a small green, glittery scrap which she thought would be just fine. Of course I fixed it for her. And as I wanted her to stay, I even added some white and green beads to make it look nicer.

Wednesday, January 21, 2009

Whatiffing 96-104, Crafting Felt


Something completely different again: what if I'd use some colour combinations which I normally wouldn't? What if I'd use some awkward material, like this left-over crafting acrylic felt in strange colours?

What if I'd combine it with free motion machine embroidery, cutting holes in it, weaving it over and under, letting it tell stories both of dwarfs and aliens ...

Monday, January 19, 2009

"My Grandmother's Garden"


Today I'm almost finished with "My Grandmother's Garden" - it's an embellished picture measuring 8,5x10" (22x26 cm).

What I enjoy so much about the embellisher is that you can use the tiniest of scraps to create a new piece of cloth and also re-use and present those very old samples of needlework in your stash, which have been carefully made and collected by women of generations before you ...

So, with this very modern machine you can assemble those old treasures to be cherished again.

I'm not sure if to add some more to this piece - maybe I'll go out and look for a thin branch of a birch for the mounting.

Sunday, January 18, 2009

Textile Flowers, Whatiffing 87-95


Subsequently to the textile leaves - here are the flowers to follow! (Looks a bit like spring already, doesn't it?)

Like for the leaves, I used white wool roving for the base and punched different kinds of textile (artificial) flowers onto it - as you can see, they behave quite different depending on the fabric they're made of.

They all shrink pretty much while being punched - you will have to take that into consideration when composing.

For a better finish, I used a hand-felting needle to place some small dots of wool in the middle of each flower.

I'll give you the link to Sara's Whatiffing blog here once again, as Sara has now opened a Whatiffingaround Group at Flickr for this project!

Friday, January 16, 2009

Whatiffing 78-86, Textile leaves


For this whatiffing, I've experimented with embellishing different kinds of textile leaves on white roving. I think they could be very well used as a base for machine or hand embroidery, or just being part of a more intricate floral composition.

If you want to try it out, don't forget to rip off the plastic or even metal veins before punching - and add woolen ones for the finish!

Thursday, January 15, 2009

Winter tree - dreaming of spring


Inspired by some of the whatiffing experiments of yesterday, I continued with this picture of a white tree, sized about 23x28 cm (9x11").

I punched mostly thin cotton and silk fabrics (thank you, Paula!) and net lace on white pre-felt for the background -the tree itself is embellished with wool yarn, embroidered and finally beaded with different kinds of small glass beads.

At the moment, I'm so full of ideas and inspiration that I almost feel like exploding ...!

Wednesday, January 14, 2009

Whatiffing 69-77, White connection


Wow! Reading the comments on last posting, I'm happy to see there are three new members in this very exclusive club - Paula, Renate and Yvette! Sara, if you're reading this post while still on holiday, you'll be as happy as I am! (I just noticed that the link to Saras What-if blog didn't work out - I've corrected that now, so push yesterday's button again for further information, please!)

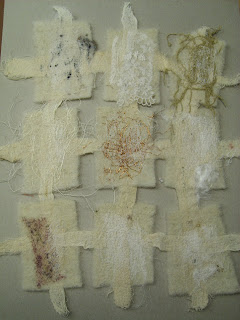
I made nine new pieces myself today, the basis is white pre-felt, connected/"woven" with vintage cotton fabric strips, then embellished - using a layer of tea-dyed gauze on all - with:

1. white merino roving mixed with cotton caps
2. vintage net lace
3. unbleached handspun linen thread
4. fine sisal fibers
5. copper tinsel
6. silk thread waste
7. printed cotton fabric
8. white linen fibers
9. white silk fibers

(If you click on the label "whatiffing" under this posting, you'll find my earlier postings on this matter - or, if you only want the pics, you can click on the flickr-button on the sidebar and take a look at my album named "Sara's Whatiffing Project".)

I got some good ideas out of these white whatiffings and am just working on a little white picture ... more about that tomorrow!

Tuesday, January 13, 2009

Hot spots, Whatiffing 60-68


I'm taking up the Whatiffing series again (for newbies: here's the link to Sara's Whatiffing-project) - as I find this experimenting with the embellisher to be both fun and useful for boosting my imagination for further projects.

It's a pity I seem to be quite alone doing this very project, because I'd love to see yours too!

Anyway, this time I've broken up the 2"x 3" frame even more, letting the fibers - different knitting yarns held between two layers of cobweb thin red wool - spread freely while being punched.

They make me think of irregular pieces of mosaic and I can imagine them as a background, combined with another colour scheme ...

Monday, January 12, 2009

My calendar bowl

I'm writing diary again. Well, not really forming full sentences and thoughts, just drawing a simple bowl in my calendar, like this:


and jotting down, each night, the things which were given to me this day, and which made me happy and grateful.

- Now, while writing this, I can see that my bowl looks like a great smile!

Sunday, January 11, 2009

My crazy quilt Beggar's bowl taking shape


My bowl is taking shape - although it's hard work for the fingers to get the needle all through.

As the fabric scraps are not only for decoration but also stabilizing and shaping the bowl, I have to use a lot of backstitches for quilting and holding them down and must pull them quite hard. Although double and firm, the thread breaks now and then.

It's slow sewing - and almost meditative.

Friday, January 9, 2009

A textile Beggar's bowl as a What-if project

Well, I think the herald angels have now sung enough for this season and it's about time to go back to normal again ...

It's been lovely to spend the holidays with kids, friends and family - and now I'm equally enjoying getting back to work, taking part in your projects and sharing mine with you.

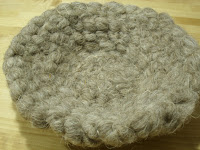
Reading 'Everyday Sacred' by Sue Bender lately inspired me trying out a textile variation on a Beggar's bowl - as a what-if project, raising the patched and quilted surface to a sculptural form, using textile media only, adding the scraps of fabric for decoration as I go.


I took a woolen cord, as you use it for weaving sturdy, woolen country carpets as I had this at hand, but I'm sure it would work in a similar way with bundled or plaited strings of rags. (An other alternative would be to crochet a basic bowl with rag string or fabric rope.)
I built up the bowl going circularly upwards, like a potter would do with strings of clay, me of course having to secure the straps with long pins and then attaching it with thread.

I kept the bowl quite small and flat for this first try - the flatness allowing me to twist the bowl inside out for easier application. I want to keep the patches and the quilting rather rough and raggy for this surface and am using odd scraps and black cotton thread.


The expression "Beggar's bowl" goes back to the tradition of Buddhist monks, who will accept whatever given in their bowl as nourishment for the day.

I think this is a wonderful allegory to a what-if project ...
(Please have a look at Renates What-if blog too - she's doing some other interesting what-iffing with raised textile surfaces.)